Showing posts with label Desserts. Show all posts

Wednesday, May 6, 2015

Blueberry Macarons


Let me tell you, if you want to treat yourself or someone else with something really special you should bake these macarons. Little acidic taste that comes from blueberries combined with white chocolate ganache filling and crunchy texture of macarons will make experience out of this world.


Although this fruit is generally great in baking, have in mind that fresh, frozen, or even dried blueberries won't do the job when making macarons. What I used instead were dehydrated or freeze-dried blueberries and they worked pretty well, both in shells and filling. They produce nice taste and natural purple color. Freeze-dried blueberries are available in Trader's Joe, Whole Foods or Target. I like to make bagels with them too - more about it soon on the blog. Recently I found freeze-dried strawberries in a store and got very excited - still trying to figure it out dessert that I would like to make with them.


Blueberry Macarons


You need:

140g egg whites, on room temperature for few hours
100g white granulated sugar
160g finely ground almond (almond flour)
240g powdered sugar
10g freeze-dried blueberries powder (pulverized in food processor)
2-3 drops purple food color


For filling:

200g white chocolate
2 tablespoons butter
1/2 cup heavy cream
10g finely chopped freeze-dried blueberries


Steps:

Line 3 large baking sheets with parchment paper.

In a bowl combine powdered sugar with ground almond.

In another bowl beat egg whites with electric mixer on medium speed until foamy. Increase the speed and while mixing gradually add granulated sugar in 3 batches, one at a time. Beat on high speed until stiff peaks form.

Stir in nut-sugar mixture and food color using spatula. Do not over mix it. Batter shouldn't be too thick or too lose.

Spoon mixture into pastry bag fitted with a round tip. Pipe rounds, 1-inch apart, on the baking sheets. Let it stand 20-40 minutes, until dry film forms on surface. This is very important stage, if there isn't dry film on surface it will cause macarons to crack while baking.

Preheat the oven. In my oven I bake macarons on 285F. Usually, people do it on 300F. Do not open the oven for first 7 minutes. In my oven, it takes 13 minutes for macarons to be done. You can check if they are done by touching them and moving them, if they break they are not ready to go out. To much of baking is not good either, because they get brown and change their original color.

When shells are done, cool them on wire racks.

Make ganache. Heat heavy cream until it starts to boil. In a bowl, place white chocolate chips and butter cut in small pieces. Pour in hot cream, cover the bowl with lid and wait for few minutes. Then stir ganache until all chocolate is melted. Add chopped freeze-dried blueberries and stir until they start to dissolve. Remove it to fridge for 15 minutes to thicken. Spoon it into pastry bag and fill between two macaron biscuits, making a "sandwich" held together by ganashe.

Store macarons in airtight containers in the fridge.


I took a picture of macaron with a bite just to show you how nice it looks inside. See it bellow.


Tuesday, March 3, 2015

Coconut Crescent Rolls (Kokos kiflice)


My mom used to make these when I was a kid and I loved them so much. They are somewhat similar to German vanilla crescent rolls, but with added taste and texture coming from coconut flakes. They will start melting in your mouth with first bite. Then you have a sip of black coffee and you can be sure your day started well. You have to admit - life is good.


Although our relationship in the kitchen has always been very complicated, I have to say that my mother's little coconut crescent rolls are the best. Bellow is her recipe.


You need:
1 3/4 stick (200g) unsalted butter, softened on room temperature
2 cups (250g) powdered sugar + 1/3 cup (50g) for coating
2 eggs
2 cups (200g) finely shredded coconut
3 1/4 cups (400g) all purpose flour
1 tablespoon vanilla extract


Steps:

Preheat the oven to 335F (170C). Line a large baking sheet with parchment pepper.

Beat butter and sugar with a hand mixer until you get nice consistent creamy mixture. Add eggs, one by one, and vanilla extract, while you are mixing. Then add flour and shredded coconut. Mix everything using hands and put dough to fridge to chill for 20 minutes.

Make the balls (walnut size) with the dough using your hands, then roll them, lightly flatten, and fold ends to create crescent shape. Place them on the baking sheet and bake for about 10 minutes - until they start getting golden color. Roll the warm rolls in powdered sugar until completely coated.

Rolls can stay fresh for days, actually getting even better over time.


Sunday, January 4, 2015

Yule Log Cake, Bûche de Noël, Panj torta


This is a famous Christmas cake. In Serbia people make it for other occasions too, birthday parties for example.


Although it looks complicated, it is really easy to make and the focus is on presentation: I wanted my cake to have a very natural look of an old log, deeply in the woods, covered with snow and mushrooms, and surrounded with pine tree branches.


My preparation took a bit longer because I wanted to make chestnut filling from scratch, starting with peeled chestnuts, rather than using canned chestnut puree.


You need for the sponge:

4 large eggs, at room temperature
100g powdered sugar
Pinch of salt
1 teaspoon vanilla extract
100g all-purpose flour


For chestnut filling:

300g chestnut puree, see the recipe for homemade chestnut puree
100g whipped cream
1 tablespoon dark rum (if there is none in chestnut puree)


For the chocolate glaze:

150g dark chocolate
1/2 cup (113g) butter
1 tablespoon dark rum


For decoration: Powdered sugar, meringues, marshmallows, pine branches


For meringue mushrooms:

1 large egg white
70g powdered sugar


Steps:

First make the sponge. It is same one as for the Genoise jelly roll.

Preheat the oven to 425F (220C).

Line the baking sheet (15''x10'') with parchment paper.

Mix the eggs with sugar until they triple in volume. Add salt and vanilla extract. Combine with flour using a wooden spoon, not hand mixer. Batter should be fluffy and light if you want to get soft and nice sponge.

Pour the batter onto the baking sheet, make it even, and place in the oven. Bake it for about 10 minutes, until color is light brown and the sponge springs back when touched.

Take the sponge out from the oven, let it rest for a minute. Remove it from the baking sheet, with the parchment paper, and place it over clean kitchen towel. Roll up everything together, sponge, parchment paper and kitchen towel, starting from a long side, and leave it to cool down completely. Then peel off the parchment paper.

In the meantime make the frosting. Mix together chestnut puree with whipped cream using spatula. You can reduce the amount of frosting but I love the taste of chestnut so much that I usually go wild with it.

When the sponge and frosting are completely cooled down, spread the chestnut frosting over the unrolled sponge and roll it back. Place the log on a serving plate. Cut one side of log diagonally about 2'' from the end. Place the cut on the side of the log just as you see on the pictures.

Make the chocolate glaze. I usually go with chocolate cream made of butter and chocolate, but you can use heavy cream instead of butter to get ganache. Melt chocolate over double boiler and add butter and dark rum. Cool it over a dish filled with ice. When it is tick enough, spread it over the log. Drag a fork through the glaze to get bark texture.

To make meringues mix egg white with sugar to get thick mixture. Pipe it over baking sheet lined with a parchment paper. Bake it for about one hour on 195F (90C). 


Decoration:

Use marshmallows for base and meringues for cap to create mushrooms. Glue those two parts using chocolate cream. Place them over and around the log. Arrange pine branches. Sprinkle powdered sugar over everything to resemble snow.


Sunday, December 21, 2014

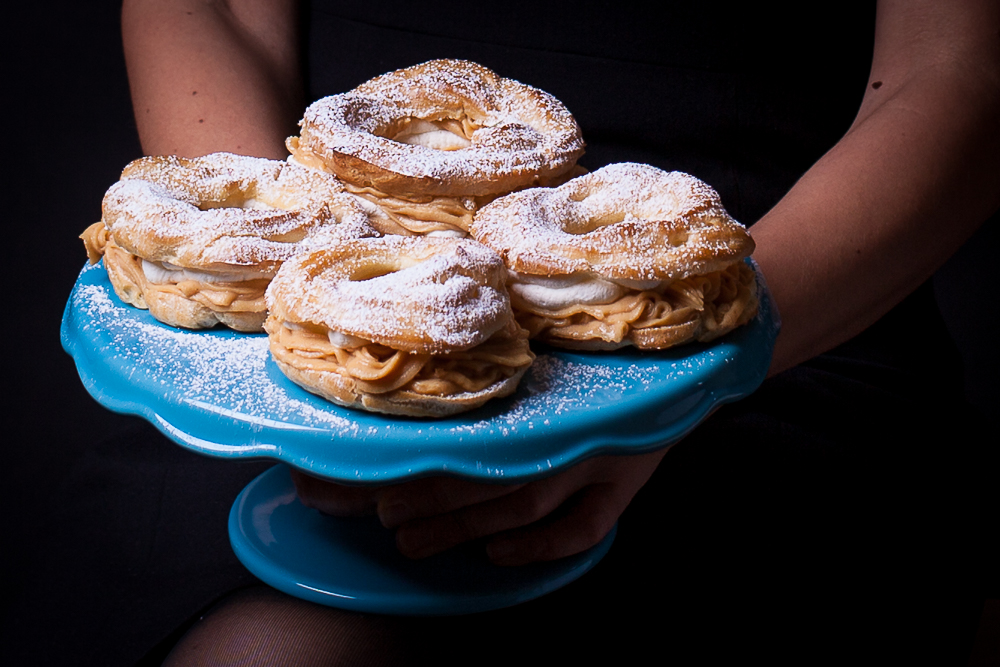
Mini Paris-Brest


This is the best dessert that I've tried recently. Yes, I do like choux pastry filled with cream, let's say Cream Puffs are my favorite thing in the world, but this one has brought it to another, higher level.


Everything is cool about Paris-Brest: the way how it was invented, puffy crust, filling with ground almond and caramel mixture, and the look. I have to say I prefer mini version because it is easy to serve; big ring can be challenging for cutting.


This dessert was invented more than hundred years ago, to celebrate famous bicycle tour in France, Paris-Brest-Paris. Cake had the shape of a bicycle wheel and quickly became popular among participants in biking event due to its high caloric value. Today, it can be found in patisseries throughout France.


I found this recipe here. When I saw Paris-Brest on that blog I knew immediately I had to make it.


You need for the choux pastry:

4.2oz (125ml) beaten eggs (2 to 3eggs)
4.2oz (125ml) water
2oz (62ml) vegetable oil
1 tablespoon sugar
Pinch of salt
2.6oz (75g) all-purpose flour
1.8oz (50g) butter


For almond-caramel mixture:

1.8oz (50g) sugar
2.1oz (60g) raw almond


For the filling:

8oz (240ml) milk
8oz (240ml) heavy cream
4 egg yolks
5.3oz (150g) sugar
1.5oz (40g) cornstarch
1.8oz (50g) butter
1 tablespoon vanilla extract

Whipped cream, optional


For serving:

Powdered sugar


Steps:

Almond-caramel mixture:

Heat sugar in a small pan over medium heat.When it's caramelized, but before it starts to burn, remove it from the heat and add almonds. Mix it together and spread the mixture over parchment paper. Let it cool down completely and then grind it in a food processor.

Choux pastry:

Preheat the oven to 395F (200C). Line the baking sheet with parchment paper. Draw 8 circles on the back side of the paper, about 4 inch in diameter. Prepare a piping bag with a third of an inch tip.

Put oil and water in a medium pan and bring it to boil. Add sugar and salt. Remove the pan from the heat and stir in flour. Mix it using wooden spoon until you get consistent dough. Pour in beaten eggs and mix it until you get smooth and glossy mixture.

Put the dough in the piping bag. Trace the circles you already drew on parchment paper. Every mini puff should bi built of three piped circles, one outer, then inner and top one that crosses both. Or, use wider tip and make only one circle.

Place baking sheet on the middle rack of the oven and bake them about 20 to 30 minutes, until the crust becomes puffy and golden brown. Do not open the oven until the pastry is done.

Cool puffs on cooling rack, and split them into halves using sharp knife.

In meantime, make the filling.

In a medium pan heat half of the milk (4oz) and heavy cream (8oz). Add vanilla extract. In another pan mix egg yolks with sugar and starch and then gradually add remaining 4oz of milk (it should be hot), while constantly stirring it. Then, pour that mixture into the first pan with hot milk and heavy cream. On low-medium heat cook the cream, stirring it continuously, until it thickens.

When the cream has consistency of pudding, remove it from the heat. Stir in butter.  Place the pan with the cream on a large shallow dish filled with ice. That is the best way to cool the cream quickly. When the cream is cooled completely add ground almond-caramel mixture and stir everything well.

Fill the choux rings with the cream using piping bag. Optionally, add whipped cream over the cream.

Dust the rings with powdered sugar before serving. Keep Paris-Breast covered in a fridge.


Wednesday, October 15, 2014

Baked Stuffed Apples


This is a perfect Fall treat. Easy to make, delicious and healthy. You can have it for breakfast or dinner. Divine smell will fill the air throughout your home while the apples are baking in the oven. 


When I was a child, my parents used to bake whole apples whenever my brother and I had tummy problems. Similar to apple sauce, they were easy to digest and contained pectin to help soothe the stomach.


Here is a version of baked apples with dried fruit, nuts, spices, and drizzled with honey. Very rich, but still healthy!


You need:

6 sweet apples
1/2 cup walnut, chopped
1/2 cup dried apricot, chopped (you can use other dried fruit such as cherries, cranberries or raisins)
1 teaspoons cinnamon
1/2 teaspoon allspice
2-3 tablespoons butter, cut into small pieces
1/3 cup honey


Steps:

Preheat the oven to 355F (180C).

Mix chopped ingredients, apricot and walnut, with spices. Core the apples. Cut off the apple tops. Place apples on baking dish. Stuff the holes in the apples with prepared mixture. Add small pieces of butter on the top of stuffing, drizzle apples with honey and bake for about 50 minutes. If stuffing is about to get burned cover the apples with aluminum foil.


Thursday, October 2, 2014

Birthday Nutella Cake


My husband had a big birthday last month. 40th. I always make famous and complicated cakes for his birthdays. This time I wanted to bake famous German Dark Forest Cake (Schwarzwalder Kirshtorte), but he said no, reminding me that last time the cake didn't turn well because we didn't have good sour cherries, and here in the US it is almost impossible to find them in the fall, even frozen. So I said, ok, let's do something different and new.


My husband loves Nutella, kids too, so I thought, let's create an easy Nutella cake that everybody would like. I was doing some research on the Internet but didn't find anything appealing, so I came up with my own recipe. I chose chocolate genoise cake as a basis that pairs well with Nutella frosting. My idea was to keep taste of Nutella dominant as much as possible. And, I wanted rustic look too.


You need for sponge:

1 1/3cup (160g) flour
1/3 cup (50g) cocoa powder
Pinch of salt
8 large eggs
1 cup (200g) sugar
5 tablespoons butter  (heat the butter and remove the white part)
1 tablespoon vanilla extract

9-inch round baking pan lined with parchment paper

For syrup:

1/3 cup water
1/3 cup sugar
1/3 cup white rum


You need for frosting:

175g semi-sweet or dark chocolate
100ml heavy cream
50g butter
300g Nutella

Chopped hazelnuts for decoration.


Steps:

Sift flour with cocoa powder three times. Add salt and mix it.

Heat the oven to 355F (175C).

Pour clarified butter into a pan and stir in vanilla and cook on a very low heat until hot. It should be hot when you add it to the batter.

Make a double boiler: a pan with simmering water and a glass bowl over it. Using whisk beat the eggs and sugar in the glass bowl. When egg mixture becomes warm and start to thicken remove the bowl from the heat. Continue to mix eggs with electric mixer, on highest speed, until the volume triples, becomes pale yellow and holds a ribbon when whisk is lifted.

Add 1/3 of the dry ingredients to eggs and fold in gently with rubber spatula. Add the remaining flour-cocoa mixture and fold in until it is well blended. Do not over-mix it, otherwise sponge will be too dense. Place 1 cup of batter into the hot clarified butter with vanilla extract and mix together. Than transfer it to batter and gently fold it in.

Spoon the batter into baking pan and bake it for about 30 minutes. The center should be firm enough.

When the sponge is done, remove it from the pan and place it on a cooling rack to cool down.

In the meantime, prepare frosting. Melt the chocolate in heavy cream and butter, in double boiler, over simmering water. Remove it from the heat and fold in Nutella. Cool down the frosting until you get right consistency to spread it.

Cut the sponge into three even layers. First, brush the top of  the first sponge layer with 1/3 of syrup, then spread 1/3 of frosting... do the same with remaining sponge layers, syrup and frosting.

Sprinkle chopped hazelnuts over the top of cake. They always add nice texture and flavor to the cake. Keep the cake in a fridge covered with a dome. Cakes are always better a day after.

Keep the cake out of the fridge for at least 45 minutes before serving. 


Happy birthday, daddy!

Tuesday, September 9, 2014

Quick Plum-Chocolate Jam (Džem od šljiva sa čokoladom)


This is a super easy and tasty jam, made for special occasions. I am not a jam person, I would always rather choose Nutella over jam to fill my crepes, but this is something even better - fruit and chocolate together.


On this blog I already have recipes with plum and chocolate: Prune-Chocolate Balls and Plum-Chocolate Tart, so now you know I am a huge fan of that combo.


Since my kids for some reason do not like dark jams, only bright ones (apricot and orange), it didn't make sense to make more than one jar. Plus, this jam is very rich in taste, so you use it in very small quantities. And, I don't like using pectin or anything artificial to keep my jam fresh for months. One jar at a time.


I've never thought about baking jam, as my mom always cooked it in large pans, but it is possible. Dutch oven is a perfect choice for that. This is a revolution method, very easy and fast, and going forward I will make all my jams this way. Look at that jam texture on the pictures, this is really great way of making it.


Plum-chocolate jam is great for crepes, but you can use it for many other things, as you do with regular jam. Recipe for crepes find here.


You can experiment with proportion of ingredients, based on you taste, but these are all good for my palate!


You need for 1 jar (375ml):

1.3lb Italian or any other plum, very ripe and sweet
1/2 - 1 cup (100-200g) sugar (depending how sweet the plum is)
100g dark chocolate (60% Cocoa)
2 tablespoons dark rum or vanilla extract

Dutch oven with lid


Steps:

Wash and dry plums. Remove pits and cut them into small chunks.

Preheat the oven to 450F (230C).

Place plums into Dutch oven. Add sugar over it. Bake it for 20 minutes on 450F, and then decrease the temperature to 355F (180C), and bake for additional 20-30 minutes until you get nice consistency of jam with some chunks of plum. Remove it from the oven. At the and add chocolate and  rum, stir it and cover with lid. After 10-15 minutes put jam into sterilized glass jar, very carefully, little by little to avoid breaking the glass as jam is still hot. Put the lid on. When it is completely cooled down remove to a fridge. Consume within 3 weeks.


Wednesday, May 14, 2014

Pistachio-Almond Heart Cookies


Recept na srpskom

I am nuts for nuts. In addition to eating them whole and raw all the time, I like to use them in baking too. Almonds and pistachios are my favorites these days, the former for its taste, the latter for its color.


Look at those pretty cookies! I love their texture so much!


You need:

1 2/3 cup (210g) all-purpose flour + some for dusting
1/2 cup (50g) ground almonds
Pinch of salt
1 cup (230g) unsalted butter, at room temperature
3/4 cup (100- 130g) confectioners' sugar
1 large egg yolk
1/2 tablespoon vanilla extract
1/3 cup (40g) unsalted pistachio, finely chopped


Steps:

Sift the flour, then combine it with a pinch of salt, ground almonds and half of pistachios.

In another large bowl mix softened butter with sugar until you get creamy mixture and then add egg yolk and vanilla extract. Stir in flour mixture until you get smooth and firm dough. Divide it into two disk shapes, wrap it with plastic foil and move to a fridge for 1 hour.

Preheat the oven to 375F (190C). Line a large baking sheets with parchment paper. 

Dust a work surface and a rolling pin with flour, take one dough disk from the fridge and roll it out until it is about 4mm thick. Cut out cookies with hearth-shaped cutters. Sprinkle them with the rest of pistachios, then cover them with parchment paper, and roll with rolling pin again, to press pistachios into the dough. Place the cookies on the baking pan. Repeat with the rest of dough.

Bake cookies, on middle oven rack, until the edges start to become light brown, 8-10 minutes. Cool them on wire rack.


Wednesday, April 30, 2014

Homemade Mozart Chocolate Balls (Mozartkugeln, Mocart kugle)


I've been planning to make Mozart Chocolate Balls for a long time, ever since I found Kori's recipe for a homemade version. There is something special about these balls which applies to other European truffles as well: rich and sophisticated taste, nice packaging, long tradition and high price. Hello, Raffeallo Balls! Hello, Ferrero Rocher Balls! You can find homemade version recipes for both candies on my blog.


Is is not easy to find Mozartkugeln in America but still there are few here and there, especially around big holidays. They have layers of dark chocolate, marzipan, pistachio and Nutella. I know, it is not easy to find all ingredients and they are not cheap, so that is the reason it took me so long to make them. Although there is no baking involved, the preparation process is time consuming, but you will enjoy Mozart Chocolate Balls every bite. Longer they last, better the taste is.


You need for 20 balls:

440g marzipan (I used store-bought, but you can make it too)
1/4 teaspoon almond extract, optional
50g unsalted pistachio, shelled, plus some for decoration
40g Nutella, frozen
150g dark chocolate + 4 tablespoons heavy cream


Steps:

Put Nutella in the freezer.

Grind pistachios in food processor.

Add 1/3 of marzipan to ground pistachio and mix it well until you get smooth green paste. Using your hands form the balls from this mixture, about 1/2 inch in diameter.

Add almond extract to the rest of marzipan and knead it well. Now, make the balls with this marzipan as well, but they should be bigger than pistachio's, about 1 inch in diameter.

Then, start to assamble Mozart's balls... first make a hole in pistachio ball with your index finger, fill it with 1/4 teaspoon frozen Nuttela chunk, roll it with hands to make ball shape again. Coat it with marzipan ball that you rolled out previously. Repeat the same with the rest.

When you are done making the balls, move them to freezer. In the meantime, melt the chocolate over steam and mix it with heavy cream. Dip frozen balls into melted chocolate using a fork, and place them on parchment paper. You can sprinkle some ground pistachio on top of the balls.

Move the balls to fridge to firm up chocolate coating and then place them into small paper liners. Keep them in fridge.


Monday, March 10, 2014

Dried Fig, Date, Pecan and Honey Balls


Another healthy dessert. I made those for my girlfriend who is vegan. No baking, no hustle, no sugar, no fat, just mixing healthy stuff, that is all. And, yes, they are irresistible.


You need for 20 balls:

220g pecans
350g dried figs, remove stems and chop them
100g dried dates, chopped
30g honey

Steps:

Grind pecans in food processor, then add dried figs and dates. Mix until you get coarse paste. Add honey and after pulsing for few seconds move mixture to fridge to harden for about 30 minutes. Use your hands to make balls. Place them into paper liners. Enjoy!


Saturday, March 1, 2014

Healthy Dark Chocolate Truffles with Prunes and Walnut


Super easy, super fast and healthy dessert. For me, these days it is all about healthy food choices because I plan to look fabulous this summer:) To find healthy and at the same time tasty dessert is hard, but this one meets both requirements. I found the recipe on Mihaela's blog, Tortelina, and I knew it right away - combination of chocolate and prunes with dark rum and walnuts - this can't be bad.


You need:

250g prunes, chopped
2 tablespoons dark rum
100g coarsely chopped walnut
100g dark chocolate (60-70% cocoa)

For glaze:
100g dark chocolate (60-70% cocoa)


Steps:

Soak prunes in dark rum and put aside for 30 minutes.

Melt 100g of chocolate.

Place prunes in food processor and pulse for couple of seconds. Add walnuts and chocolate and stir all well. Move it to fridge to harden for 15-20 minutes.

Make balls with hands. Melt the rest of chocolate and dip the balls into it. Place them on a parchment paper. Move to the fridge. After 1 hour they are ready to be served.


Sunday, January 26, 2014

Tulumba, Fried Dough Soaked in Syrup


I have been planing to make this delight for almost two years. This is a calorie bomb, so I hesitated, and it didn't look like an easy thing to make. I had everything that's needed: foolproof recipe from Maja, tool for dough piping she gave me the when we met in Belgrade for the first time (we organized a small meeting of Serbian food bloggers), and finally, a gorgeous Turkish dish for serving.


Like many other Turkish desserts, such as well-known Baklava or Kadaif, this one is soaked in water-sugar-lemon based syrup too. I don't know what is so special about Tulumbas, but people from Balkans cannot resist them. They never sit in the fridge for too long.

So I made Tulumbas, and when they were gone I decided to immediately start sugar-free diet :) To feel less guilty than I did, you can use half the amounts from the recipe below. Go to Maja's blog to see pictures of whole process of making Tulumbas.


You need for syrup:


2lb sugar
2 1/2 cups water
1/2 lemon, finely sliced
Few kumquats, sliced, optional


You need for dough:

1 3/4 cup water
Pinch of salt
2 teaspoons sugar
1/2 cup +1 tablespoon vegetable oil
2 cups all-purpose flour
4 large eggs


You need for frying:

4 cups Canola oil


Steps:

You should make syrup first. In a medium size pan cook water with sugar until it starts to boil. Reduce the heat, add sliced lemon and cook for 10-15 minutes. Put the syrup on a side to cool down completely and then move to a fridge.

To make dough, in a medium size pot, bring water, salt, sugar and oil to boil. Turn the heat off, add flour and stir with a wooden spoon until you get smooth dough. Stir in beaten eggs and mix until dough becomes smooth and sticky.

In a large size pan add Canola oil. Do not turn on the heat yet. Fill the piping tool with dough, use star tip, and start to pipe small ridged tube shapes 2 - 3 inches long into pot with cold oil. Since the dough is sticky, you can use kitchen scissors to cut shapes loose. If you don't have the piping tool, a pastry bag with wide star tip will do it. Keep adding shapes until surface of the pot is filled. You won't be able to fit all dough into one pan, so you'll probably have to fry three or four batches. Now turn the heat on to 4 out of 6. Fry Tulumbas on both sides until they puff up and become golden brown. While frying, they will roll over on their own or you can tap them. When Tulumbas are done, turn off the heat and place them into the pot with cool syrup. While Tulumbas are bathing in the syrup, fry the next batch, but wait for 10 minutes for oil to cool down between batches. In the meantime, remove first batch to a serving dish. Repeat the same with the remaining dough. In the end, if some syrup is left over, pour it over Tulumbas in the serving dish.


Serve Tulumbas cold and keep them in the fridge.

Piping tool for Tulumbas


Monday, January 13, 2014

Chestnut puree (Kesten pire)


I craved this desert for a long time. It is not easy to find chestnuts here, and if you do, they are so expensive. My husband payed $18 for 3 pounds of chestnuts in shells, he couldn't resist it. But, I swear, at least one third of them were rotten and useless. My advice to you is to buy them already shelled and cleaned, in a bag, I found one in Whole Foods. It is more expensive than chestnuts in shells, but overall it is a better value.


I will be honest, cleaning chesnuts is a big pain. I did it both ways, roasting and boiling, and I don't have any preference. It is going to be a torture for your thumbs. But as soon as I tried my chestnut puree, I was transported to other time and other place, and the taste brought so many childhood memories. It was worth it, after all.


Chestnut puree is, I guess, French stuff, they use it in many cakes. So this is a basic recipe and you can use it to make other sweet treats. Or, you can serve it with whipped cream as I did.


Ingredients:


400g chestnuts in shells or 300g chestnuts without shells
500ml (2 cups) milk
1/2 cup sugar
1 tablespoon dark rum
or 1 teaspoon vanilla extract
2 tablespoons unsalted butter

For whipped cream:

1 1/2 cup heavy cream
2 tablespoons sugar


Steps:


1. Cut into chestnut shell with paring knife all the way around as I did on the picture, or cut the large X into round side. This will make it easier to remove the shell after boiling.

2.  Bring a medium pan of water to a boil. Boil the chestnuts for 5 minutes. Do multiple little batches, rather than all at once, as the shells need to be removed quickly after you take chestnuts out of water.

3. Peel the shells. They are hot and you have to be very careful.

4. Add sugar to milk and bring to boil. Reduce the heat to low and add chestnuts. While the chestnuts are cooking, stir them regularly. It will take about 1 hour to have them soft enough. Pour in dark rum if you like, or vanilla extract. Remove from the heat and let it cool down.


5. Using hand blender, blend cooked chestnuts with milk until you get a smooth paste. Scoop it in serving glasses or bowls.

6. When the puree is cold add whipped cream on top of it.  Keep it in the fridge. This recipe makes approximately 2 cups of chestnut puree.


Related Posts Plugin for WordPress, Blogger...