Showing posts with label American. Show all posts

Sunday, January 31, 2016

Smoked Sausage-Cheese Biscuits


Besides sweet pies and BBQ, biscuits are my favorite American stuff, I love them so much that I loose any control when I see them, which means I can eat a great number of those. 


My excitement already starts while the biscuits are in the oven, that smell of butter is so promising. When they get out, I like to brush them with melted butter, just a final touch, and then I eat them layer by layer. 


I don't know the number of biscuits that I made, it is definitely a huge one, but I really know the best recipe for them. Over the time, I created very nice versions adding different ingredients, so far my favorites are biscuits with smoked sausage and cheese (the recipe follows), then those with goat cheese and za'atar, and biscuits with cheddar cheese. Also, I like to eat them with homemade herb butter.


For the wet ingredient, I usually use buttermilk, but I have to tell you Kefir is even better, although more expensive. However, if I don't have any of those at home, you can use sour cream with some milk, and that works as well.


Smoked sausage and cheese is a combination that cannot go wrong in biscuits. Surprisingly, I have never saw that combination here in US before, I got idea from my sister-in-low from Serbia who made the similar stuff. I gave it a try and outcome surpassed my expectations.


In my opinion these biscuits are great for breakfast, as an appetizer, and they also make a great snack. Also, they often end up in lunch boxes of my children.


You need for about 24 biscuits:

4 cups all purpose flour + some for dusting
5 teaspoons baking powder
1/2 teaspoon baking soda
1 teaspoon salt

1 stick of butter, very cold + 3 tablespoons melted butter
2 cups buttermilk or Kefir
1 cup smoked sausage, cut into small pieces
1 cup shredded cheese (Cheddar, Mexican mix)


Steps:

Preheat the oven to 400F (205C). Line the large baking sheet with parchment paper.

In a big bowl mix flour with salt, baking powder and soda. Add cold butter cut into small pieces. Rub the butter into flour mixture using your fingertips. After few minutes when you get crumbly mixture, make a well in it and add cold Kefir, or buttermilk, cut smoked sausage and shredded cheese and mix everything with a big metal spoon until you can form a very rough ball.

Move the dough onto floured surface, and form it into rectangle shape by patting. Fold it over, just like letter, and then pat it to get rectangle shape, and do folding and patting five more times, that helps to get flaky biscuits. While you work with the dough use flour generously for dusting top and bottom.

When you finally shape the dough into rectangle 1 inch tick, cut it into round shapes using floured glass or 2-inch diameter cookie cutter. Push the cutter straight down the dough. Gather the scrap dough and cut it too.

Place the round shapes on the baking sheet, slightly apart, and bake for 15-18 minutes, until biscuits' tops become golden brown.

When they are out of the oven, brush the biscuits with melted butter. They are the best when fresh, but if they are one or two days old you can always toast them.


Wednesday, May 6, 2015

Blueberry Macarons


Let me tell you, if you want to treat yourself or someone else with something really special you should bake these macarons. Little acidic taste that comes from blueberries combined with white chocolate ganache filling and crunchy texture of macarons will make experience out of this world.


Although this fruit is generally great in baking, have in mind that fresh, frozen, or even dried blueberries won't do the job when making macarons. What I used instead were dehydrated or freeze-dried blueberries and they worked pretty well, both in shells and filling. They produce nice taste and natural purple color. Freeze-dried blueberries are available in Trader's Joe, Whole Foods or Target. I like to make bagels with them too - more about it soon on the blog. Recently I found freeze-dried strawberries in a store and got very excited - still trying to figure it out dessert that I would like to make with them.


Blueberry Macarons


You need:

140g egg whites, on room temperature for few hours
100g white granulated sugar
160g finely ground almond (almond flour)
240g powdered sugar
10g freeze-dried blueberries powder (pulverized in food processor)
2-3 drops purple food color


For filling:

200g white chocolate
2 tablespoons butter
1/2 cup heavy cream
10g finely chopped freeze-dried blueberries


Steps:

Line 3 large baking sheets with parchment paper.

In a bowl combine powdered sugar with ground almond.

In another bowl beat egg whites with electric mixer on medium speed until foamy. Increase the speed and while mixing gradually add granulated sugar in 3 batches, one at a time. Beat on high speed until stiff peaks form.

Stir in nut-sugar mixture and food color using spatula. Do not over mix it. Batter shouldn't be too thick or too lose.

Spoon mixture into pastry bag fitted with a round tip. Pipe rounds, 1-inch apart, on the baking sheets. Let it stand 20-40 minutes, until dry film forms on surface. This is very important stage, if there isn't dry film on surface it will cause macarons to crack while baking.

Preheat the oven. In my oven I bake macarons on 285F. Usually, people do it on 300F. Do not open the oven for first 7 minutes. In my oven, it takes 13 minutes for macarons to be done. You can check if they are done by touching them and moving them, if they break they are not ready to go out. To much of baking is not good either, because they get brown and change their original color.

When shells are done, cool them on wire racks.

Make ganache. Heat heavy cream until it starts to boil. In a bowl, place white chocolate chips and butter cut in small pieces. Pour in hot cream, cover the bowl with lid and wait for few minutes. Then stir ganache until all chocolate is melted. Add chopped freeze-dried blueberries and stir until they start to dissolve. Remove it to fridge for 15 minutes to thicken. Spoon it into pastry bag and fill between two macaron biscuits, making a "sandwich" held together by ganashe.

Store macarons in airtight containers in the fridge.


I took a picture of macaron with a bite just to show you how nice it looks inside. See it bellow.


Thursday, December 26, 2013

Christmas Cookie Party


Last week I made Christmas cookie party for my girlfriends. Like me, they are all moms with small children, so I wanted them to have a break from their busy lives and enjoy cookies and chat with other girls. If you have small kids you know what I am talking about.


I had planed to make very festive cookies, some traditional such as gingerbread, and some a bit extravagant, like peppermint meringues and speculoos buttons.


The party was a success and I must tell you which cookies were hit - Pistachtio macarons and Oat-almond lace. Unfortunatelly, I didn't have time to take picture of the latter, but I plan to make them again anyway - although they turned out very tasty I think there is something wrong with the recipe I found in Bon Appetit magazine. It is about baking time, and next time I will add more flour and less butter, so stay tuned for the Oat-almond lace recipe.


Pistachio Macarons


I start from my basic macarons recipe but instead of using almond, I use pistachio flour which is more coarse so macarons do not look so smooth. Anyway, they are delicious with white chocolate ganache filling.

You need:

140g egg whites, on room temperature for few hours
100g white granulated sugar
160g pistachio flour (finely ground pistachio nuts)
240g powdered sugar
3-2 drops green food color

for filling:

200g white chocolate
2 tablespoons butter
1/2 cup heavy cream

Steps:

Line 3 large baking sheets with parchment paper.

In a bowl combine powdered sugar with ground pistachio.

In another bowl beat egg whites with electric mixer on medium speed until foamy. Increase the speed and while mixing gradually add granulated sugar in 3 batches, one at a time. Beat on high speed until stiff peaks form.

Stir in nut-sugar mixture and food color using spatula. Do not over mix it. Batter should be thick enough.

Spoon mixture into pastry bag fitted with a round tip. Pipe rounds, 1-inch apart, on baking sheets. Let it stand 20-40 minutes, until dry film forms on surface. This is a crucial stage. If they are not dry enough macarons will crack while bake.

Preheat the oven. My oven is strong, so I bake macarons on 285F. Usually, people do it on 300F. Do not open the oven for first 7 minutes. In my oven, it takes 13 minutes for macarons to be done. You can check if they are done by touching them and moving them, if they break they are not ready to go out. To much of baking is not good either, because they get brown and change their original color.

When they are done, cool them on wire racks.

Make ganache. Heat heavy cream until it starts to boil. In a bowl place white chocolate chips and butter cut in small pieces. Pour in hot cream, cover the bowl with lid and wait for few minutes. Then stir ganache until all chocolate is melted. Remove it to fridge for 15-20 minutes to thicken. Spoon it into pastry bag and fill between two macaron biscuits, making a "sandwich" held together by ganashe.

Store macarons in airtight containers in the fridge.


Peppermint Meringues


My favorite. When I saw them on cover page of Bon Appetit magazine, I  immediately fell in love with these meringues. They are very easy to make, and they look extraordinary. Find original recipe here.

You need:

3 large egg whites, on room temperature for few hours
Pinch of Kosher salt
1/3 cup granulated sugar
1/2 cup powdered sugar
1/8 teaspoon peppermint extract
12 drops red food color


Steps:

Preheat oven to 200°F. Line a baking sheet with parchment paper. 
Beat egg whites and salt with electric mixer on medium speed until foamy. While mixing, gradually add granulated suger in 3 batches, one at a time. When the mixture is thick enough, until firm peaks form, add powdered sugar and peppermint extract and mix it with spatula, not hand mixer.
Dot the mixture with red food color. Do not stir. Spoon meringue into a pastry bag and pipe rounds onto sheet with parchment paper. You can use different tips for you pastry bag. Make space between rounds. Bake meringues for 2 1/2 hours. When cooled down, store them in airtight containers with parchment paper between each layer of cookies.


Speculoos Buttons


I love how those sprinkles add festive look to the cookies. Original recipe from Bon Appetit magazine find here. I changed the recipe. I prefer lemon flavor in a glaze.

You need:

2 cups all-purpose flour
1/2 teaspoon salt
2 tablespoons pumkin pie spice
1 stick unsalted butter, room temperature
1/2 cup light brown sugar
1/2 cup white granulated sugar
1 large egg
1 vanilla extract

for decoration:

1 egg white
Sprinkles, sanding sugar


For glaze:

1 cup powdered sugar
1-2 tablespoons lemon juice

In a bowl combine flour, pumpkin pie spice and salt. Beat butter in another bowl until smooth using an electric mixer. Add brown and white sugar and mix until you get creamy mixture. Then add egg and vanilla extract. Reduce speed to low and stir in flour with spice.
Remove batter from bowl and divide into three parts.  Roll each piece into an 6-8-inch log. Wrap logs with parchment paper and freeze for 3 hours or overnight.
Preheat an oven to 375°. Line baking sheets with parchment paper.
Remove the dough logs from the freezer. Brush each log with egg whites, one at a time and roll them over sprinkles or sanding sugar. Using sharp knife cut log into 1/4 inch-thick rounds, discarding ends. Transfer rounds to baking sheet. While they are in the oven, keep other logs in the freezer. Bake cookies for 11-13 minutes.
When they are done, transfer cookies to wire racks and let cool.

Make glaze. Stir powdered sugar with lemon juice until you get smooth and thick glaze. Spoon it to pastry bag and make rounds on cookies. Decorate them with sprinkles or sanding sugar.


Gingerbread Cookies


Finally, I mastered making gingerbread cookies. Every year I use the same recipe, but this time they turned out perfect. Obviously, it is not all about recipe, something comes with practice:) My kids helped me baking them. My son showed advanced skills, I promised him next year I would buy him small rolling pin.

We even made window decoration with gingerbread people.


Tuesday, March 12, 2013

Waldorf Salad


I have been making this salad forever, but it is only recently that I found out its real name and the history behind it. We used to call it - Celery Root and Apple Salad and we liked to serve it as a dinner appetizer.

Last time I added dried cranberries and pecans instead of walnuts and I have to say, that was a perfect combination of flavors and texture. In my opinion, texture is crucial for Waldorf Salad - crunchy and crispy. You can cut apples and celery root in cubes, but I prefer when they are finely sliced and cut into wide stripes.

And I always use sour cream instead of mayonnaise, it is healthier and tastier.


You need:

1/2 head of Roman lettuce
1 medium celery root
1 Granny apple
1/2 lemon
1/2 teaspoon salt
3 tablespoons sour cream
2 tablespoons pecans, coarsely chopped
2 tablespoons dried cranberries, chopped


Steps:
Wash, dry in a spinner and chop Roman lettuce. Place it in serving bowl.
Peel the celery root and the apple, half them and then slice on mandolin or slicer. Slices should be 2-3mm thick. Cut them into 1.5cm wide stripes. While you are cutting and placing them in new bowl drizzle lemon juice over each layer because apple and celery root turn dark very fast.

Add salt and sour cream and mix everything well. Transfer the mixture to serving bowl, place it over chopped Roman lettuce. On top, add chopped dried cranberries and pecan.


Tuesday, August 7, 2012

Urban Gardening in Baltimore, part 3 (Cucumber)


I am a cucumber person, which means I prefer it over tomato in a salad. It is a rather plain veggie, without high nutritious value, and there are not so many recipes with cucumber in main role.  It seems people appreciate it only when it's pickled.

However, cucumbers from my garden brought me a lot of joy. They are growing so fast and producing so many fruits. I learned that there are yellow and white flowers, male and female, and fruits are so well camouflaged that you can easily miss them.

But the best thing about growing your own cucumbers is that you can eat them with the peel without worry they were exposed to pesticides.

Below you will find three recipes with cucumbers, very simple and elegant. I want this veggie to be a true star. It deserves it.


Green Gazpacho


One night I went out with my girlfriends to a restaurant where I had this soup. I loved it so much and I tried to memorize all ingredients from the menu. Couple of days later, I bought all stuff that I needed to make it myself and tried to find the recipe on the web. It happened that I found the executive chef of the restaurant where I had eaten the soup. I contacted him and he gave me the recipe. I though that was really cool from him.

This soup is absolutely fabulous... such a great ingredients and all green, except yogurt and almonds though.

You need:
1 honeydew, peeled and chopped
1 large cucumber, chopped
1 bunch of cilantro, chopped
1/3 or to taste jalapeno pepper, chopped
1 cup of Greek yogurt
Juice of 2-3 limes
1/4 cup of chopped almonds
Salt and black pepper

Steps:
Blend honeydew, cucumber, cilantro, lime juice and jalapeno in the blender until the mix is smooth. Add yogurt to thicken the soup. Add salt and black pepper. When serving, sprinkle the soup with chopped almonds.

Do not forget to chill the gazpacho before you eat it!


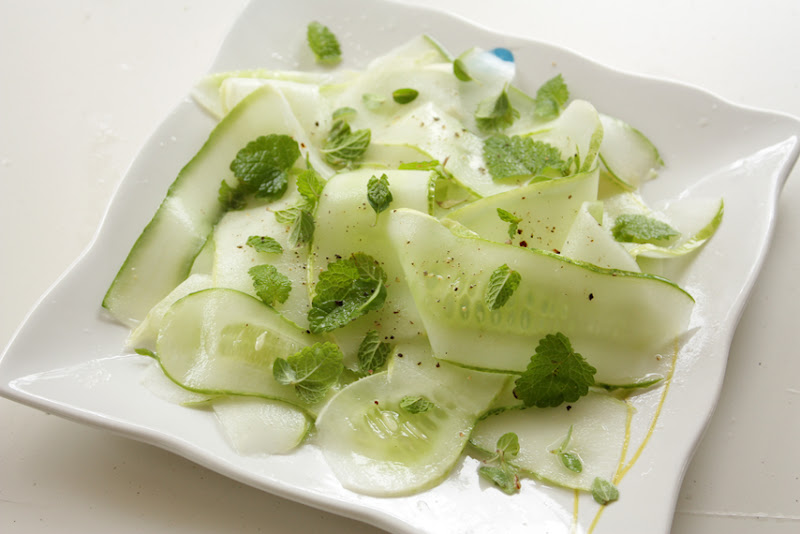
Simple Cucumber Salad with Herbs


Very refreshing and elegant summer salad. Fresh herbs, mint, lemon balm and oregano give it distinctive taste.

You need:
1 medium cucumber
1/4 cup of fresh chopped herbs, mint, lemon balm, oregano
Juice of 1/2 lemon
Salt and black pepper

Steps:
Slice cucumber with peeler or mandolin. Add herbs, juice, salt and black pepper and mix it. Serve chilled.


Cucumber Canapes


Great summer appetizer. And if you make it using stuff from your garden (cucumber, tomatoes and herbs) as I did, you will be super happy and proud eating it.

You need:

1 medium cucumber
1/4 cup of sheep cheese or Feta
1 Tbs. Greek yogurt
2 Tbs. fresh herbs, oregano, chives, thyme, finely chopped
Cherry tomatoes

Steps:

Make stuffing with cheese, yogurt and herbs. Thinly slice cucumber with peeler or mandolin, lenghtwise. Fill cucumber with the stuffing as in picture above, wrap it and put on a toothpick. Add cherry tomatoes. Serve it cold.


Saturday, April 7, 2012

Egg Hunt Cupcakes


Last weekend we went with our kids to a traditional Easter egg hunt. They are just too little to get the idea of collecting eggs hidden by the Easter Bunny. But, I didn’t give up. To make my kids more excited about the event I even made Egg Hunt Cupcakes. I wanted my cupcakes to resemble the eggs hidden in the grass. I do not know how successful I was in doing that, but the children were happy to try them.


This quantity is enough for 12 medium size cupcakes.

You need:
1 1/2 cup flour
1/3 cup unsweetened cocoa powder
1 teaspoon baking powder
1 teaspoon salt
1 cup sugar
1 cup milk
1/2 cup oil
1 tablespoon vanilla extract
1 teaspoon white vinegar

Steps:
Preheat oven to 350F (175C). Line muffin pan tin with paper liners.
In a bowl mix sifted flour and cocoa powder, baking powder and salt. In another bowl, mix the sugar, milk, oil, vinegar and vanilla extract. Then, add the dry ingredients to the wet ingredients mixture and stir it until you get smooth batter.

Pour the batter into cups and bake for 20-25 minutes. When they are baked remove them from the oven and place them on a rack to cool down.

In the meantime make buttercream.

You need for buttercream:
6 tablespoons (85g) butter
1 cup (225g) powdered sugar
1 tablespoon milk
1 tablespoon vanilla extract

Steps:
Mix all ingredients with a hand mixer. Put the buttercream in a pastry bag and pipe over the cakes.
For decoration use chocolate spirals and chocolate Easter eggs.
This recipe is featured in online magazine Mezze.

Sunday, February 19, 2012

Cake Pops for Baby Shower


It's a boy!
Just a few weeks before the birth of her baby boy, a baby shower for my friend Richa was arranged. I got the task of making Cake Pops for this event. It turned out more complicated than I expected but the cakes were an absolute crowd-pleaser so it was worth it.

Cake Pops are so American… unusual shape for the cake and a lot of decoration. As a typical European girl I did not want to use a shortcut so I made everything from the scratch… no cake mix and canned icing. Also, decoration with weird colors was out of the question, I stuck to the classic one.

 
In Starbucks they sell cake pops under the name Petites. They cost at about $1.50 each. Using this recipe you can make around 70 balls, the same size as those in Starbucks, so that is quite a good value.

And they are quite tasty. Actually addictive. Recipes for the cake and icing were taken from the net.


The ingredients for the cake:

195g (1 ¾ cups) flour
85g (3/4 cup) good quality cocoa powder (Ghirardelli)
11/2 teaspoons baking powder
11/2 teaspoons baking soda

1/2 teaspoon salt
225g (1 cup) sugar
2 eggs
235ml (1 cup) milk
170ml (1/2 cup) vegetable oil
2 teaspoons vanilla extract
235ml (1 cup) boiling water

Preheat oven to 175C (350F). Place the parchment paper in the pan. 

In a bowl sift flour and cocoa. Add baking powder and soda and salt. In another bowl with an electrical mixer beat eggs, sugar, milk, oil and vanilla extract. Then add the dry to the wet ingredients, spoon by spoon. Finally, stir into the batter boiling water. Pour the batter into the pan and bake it for 30-35 minutes.
When the cake is done take it out, and then place it on the rack to cool down completely.


In the meantime make the cream cheese icing.

Ingredients for the icing:

 
60g butter, at room temperature
225g (8 oz.) cream cheese, at room temperature
200g powdered sugar
2 tablespoons milk

Mix everything with the electrical mixer on low speed.


Below are the most important stages in making cake pops. I took photographs of them to be easily followed.


1.    After the cake was baked and cooled

2.    and the cream cheese icing was made too,

3.    Crumble the cake with your hands and add it to the icing.

4.    Mix it well using your hands.

 
5.    Scoop the cake mix with an ice cream spoon to get the same sized balls, and roll the balls with the palm of your hands. Put them on the lollipop sticks. Cover with plastic wrap and place in the freezer for a few hours.

6.    Melt 350g of good quality chocolate (Ghirardelli) in a heatproof glass bowl over a pan with simmering water, as shown. I first tried white chocolate which was not a good idea because it was too transparent. So I switched to the dark one.


7.    Before we cover the entire balls with chocolate, dip the tops of sticks in melted chocolate and put them back in the ball holes. Return the balls to the freezer for at least 1 hour. This way, the balls won’t fall from the sticks when dipping into the chocolate.
Warm the chocolate. Dip each ball in the melted chocolate (cover it completely), and swirl it around and tap with one hand until the excess chocolate falls off. Place the chocolate balls with sticks on the Styrofoam, as shown.

8.    When the chocolate has cooled, swirl royal icing over the balls. You can decorate them in so many ways, this is my version.

9.    For the rest of decoration you need: Styrofoam, colored shiny paper, border, yellow flower and a blue ribbon for bows (because it is a boy), as shown.


My friend Ana has made chocolate mustaches on a stick. And if you think that cake pops are too complicated, then mustaches are right for you. I found them very sweet.


Below is the picture of Richa ... going through the things she got for her boy who will be born soon.

Wednesday, January 18, 2012

Čupavci Cupcakes - Reinventing Traditional Dessert


When I did some research about the funny-named Serbian cake, Čupavci, which means Messy hair cakes, I was very surprised to realize that almost the same dessert exists in Australia under the name Lamingtons. To be honest I don’t have any clue how it came about, I can only guess they were created separately in completely different parts of the world.
I always had the idea to make Čupavci as cupcakes. It is very difficult to control their cube-shaped form; baking them in a muffin pan makes things much easer. And, I just like to play with different cuisines, in this case European and American. Fortunately, I found a really good recipe for sponge here and the outcome was super delicious. 
Make small cupcakes and try to buy finely shredded coconut as it is in the pictures. It will give an elegant look, almost like snowflakes topping the cakes. I used European shredded coconut that is different and there is not sugar in it.

You need for 24 small cupcakes:

for the sponge:

3 eggs

½ cup (125ml) vegetable oil

2 cups (280g) all-purpose flour

2/3 cup (150g) white sugar

1 tablespoon vanilla extract

1 teaspoon baking powder


½ cup (100ml) milk


for the frosting:

5 tablespoons (70g) unsalted butter

1 oz (30g) white sugar

2.5 oz (75g) semisweet chocolate

1/2 cup heavy whipped cream

1/2 package of unsweetened shredded coconut


Steps:

1. Preheat the oven to 355F (180C). Place the cupcake liners on a baking sheet. No need to grease them.

2. With the hand mixer beat the egg whites. Add sugar, spoon by spoon. Then add the oil and half of the flour (sifted and mixed with baking powder), vanilla extract, egg yolks, milk, and finally the remaining flour.

3. When the batter is well mixed, fill the cupcake liners to the very top. Put in the oven to bake about 16 minutes (this works for my oven). If toothpick comes out clean, cakes are done.
4. While the cakes are baking, make the chocolate frosting. In a small sauce pan melt the butter and add the sugar, chocolate and whipped cream. Allow the frosting to cool down and become slightly thick.

5. Dip only tops of the cakes in the frosting (soak up as much as possible), and then roll over the shredded coconut.


Wednesday, January 19, 2011

Ana's Savory Muffins


I have just removed them from the oven and tried ... mmm, I have to say they are super tasty, moist and rich, and so easy to make. Thanks Ana for sharing this recipe. Hope you are happy I put your name in the title.

So, find your wooden spoon and bowl and start making them. My choice of ingredients depended on what I had in my fridge, so you can be creative too. But, keep in mind some combos are better than the others.


You need:
  • 2 cups flour
  • 1 cup Kefir or Greek yogurt
  • 1/2 cup canola oil
  • 2 eggs
  • 2 teaspoons baking powder
  • 4 tablespoons finely chopped pickles (dill pickles)
  • 4 tablespoons finely chopped red pepper (fresh or roasted)
  • 4 tablespoons. finely chopped ham
  • 4 tablespoons finely chopped scallions
  • 2 tablespoons finely chopped parsley
  • salt and black pepper
Note: You can add bacon, cheese (Feta, Swiss cheese, Mozzarella), dry oregano, chives, etc.

Steps:
  1. Preheat the oven to 375F (190C). Line a 12-cup muffin tin with paper liners.
  2. Combine beaten eggs, yogurt, canola oil in a bowl, and flour, baking powder, salt and black pepper in another one.
  3. Fold the dry ingredients into the wet ingredients. And then fold in the rest of chopped ingredients. 
  4. Fill the muffin liners with the batter to the top.
  5. Put in the oven and bake for 25-30 minutes or when it is done.


Related Posts Plugin for WordPress, Blogger...